0

minioActual = $_SERVER["HTTP_HOST"]; switch ($dominioActual) { case "always-software.com": $titulo = "Installing Windows 11: A Comprehensive Guide"; break; case "always-software.uk": $titulo = "How to install Windows 11"; break; case "always-software.ie": $titulo = "Easy Steps to Install Windows 11"; break; case "always-software.com.au": $titulo = "Step-by-Step Guide to Installing Windows 11"; break; case "always-software.co.nz": $titulo = "How to Set Up Windows 11 on Your Computer?"; break; case "always-software.ca": $titulo = "Installing Windows 11 Step by Step"; break; default: $titulo = "RR-ARTI-TITU-W11_005-RR"; break; } echo $titulo; ?>"

minioActual = $_SERVER["HTTP_HOST"]; switch ($dominioActual) { case "always-software.com": $articulo = "

There are two primary methods to perform the installation:

Upgrading from Windows 10

  1. We suggest utilizing the Microsoft tool known as Windows 11 Installation Assistant, available for free download here.
  2. After downloading the assistant, you might need to install PC Health Check depending on the prompt.
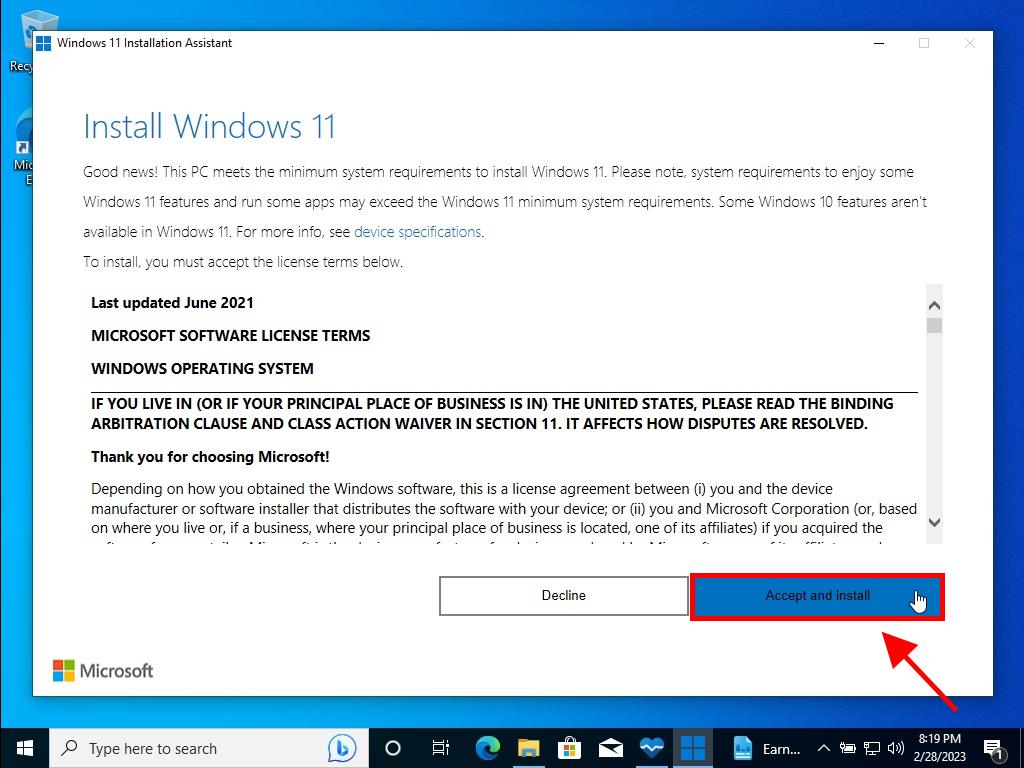
  3. Agree to the usage terms and conditions.
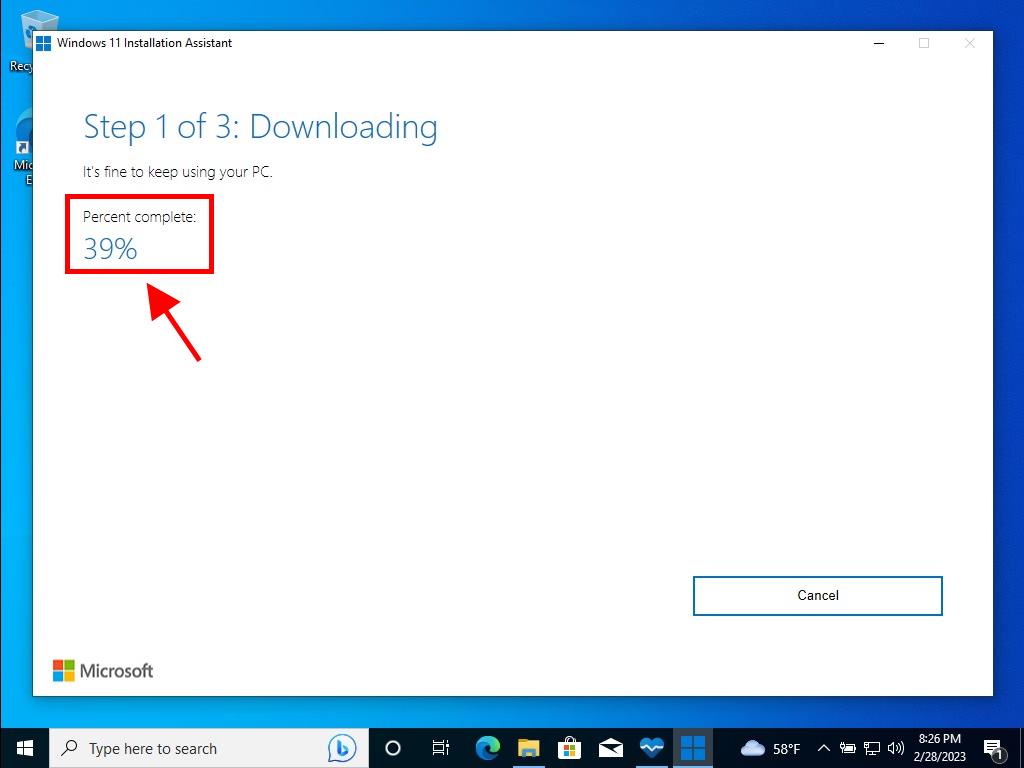
  4. Follow this by the automatic initiation of the download and installation process for Windows.
  5. Post-download, you can opt to restart your computer immediately or within 30 minutes.
  6. Restart your system, and for detailed setup instructions, refer to Installing Windows 11 from Scratch below.
Installing Windows 11 from Scratch

Note: Installation steps can vary based on the computer.

Initiate by connecting the USB and following these steps:

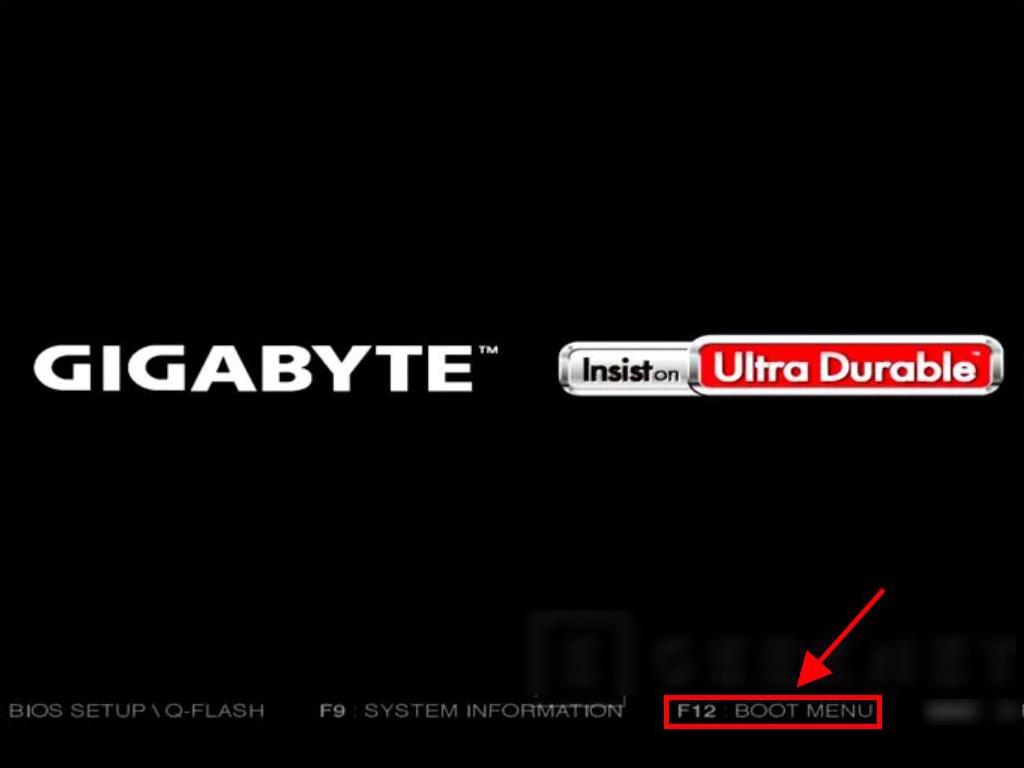
  1. Restart your PC and, upon seeing the manufacturer’s logo, press the BOOT menu key, usually F2, F10, F11, F12, or Del, to access the menu and modify the boot sequence to USB.
  2. Note: Your PC model determines the specific setup key to use at this juncture.
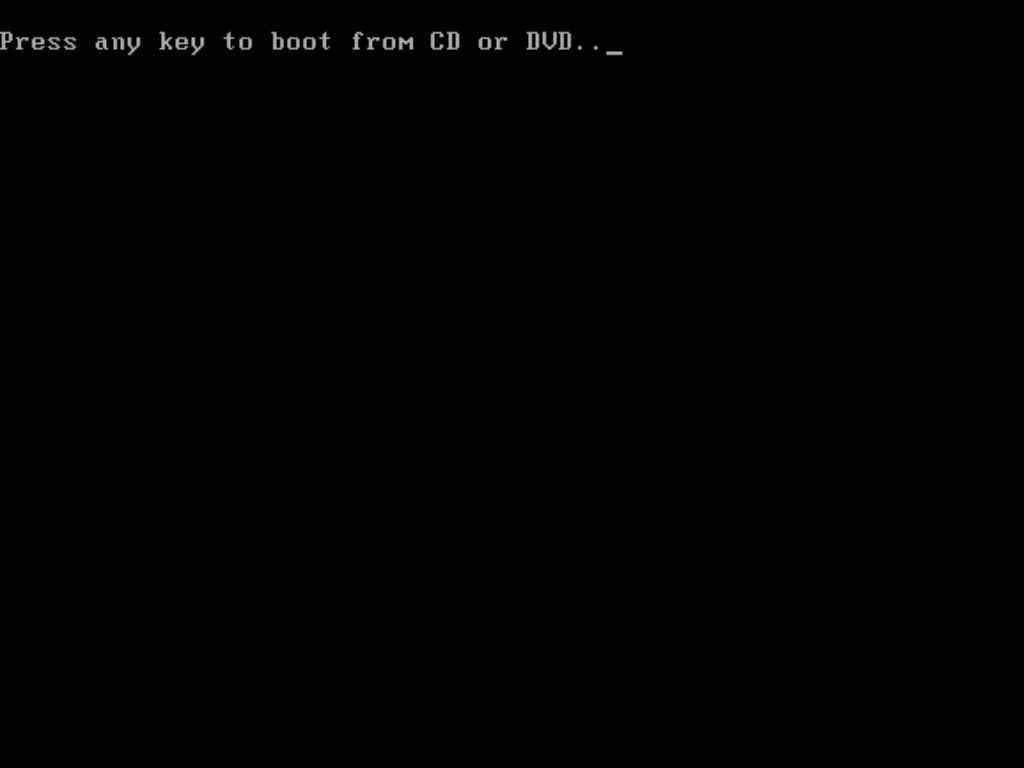
  3. After the restart, a screen will display Press any key to continue from CD or DVD.
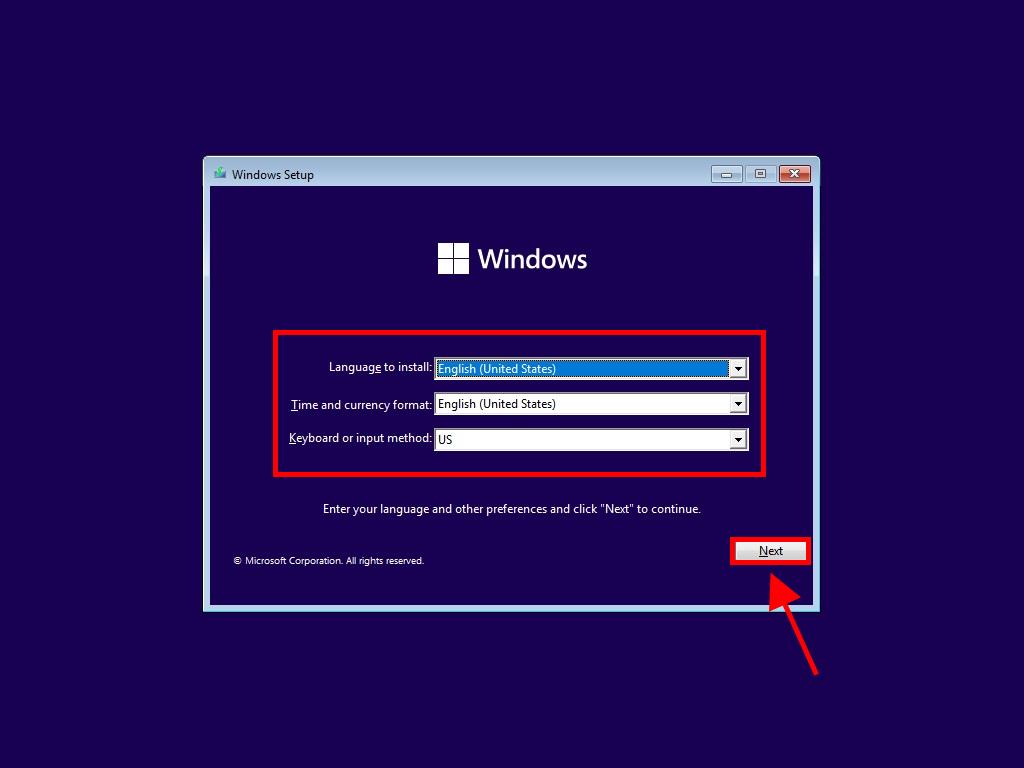
  4. Select your language, time, currency, and keyboard input at the setup program, then click Next.
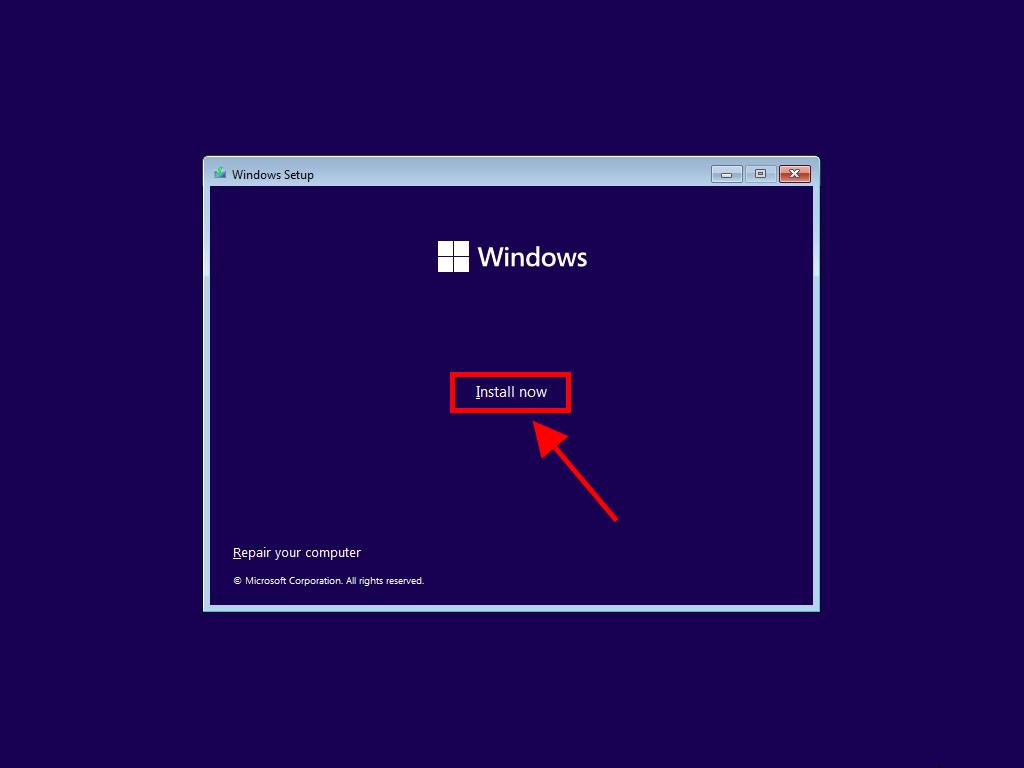
  5. Proceed to click the Install now button.
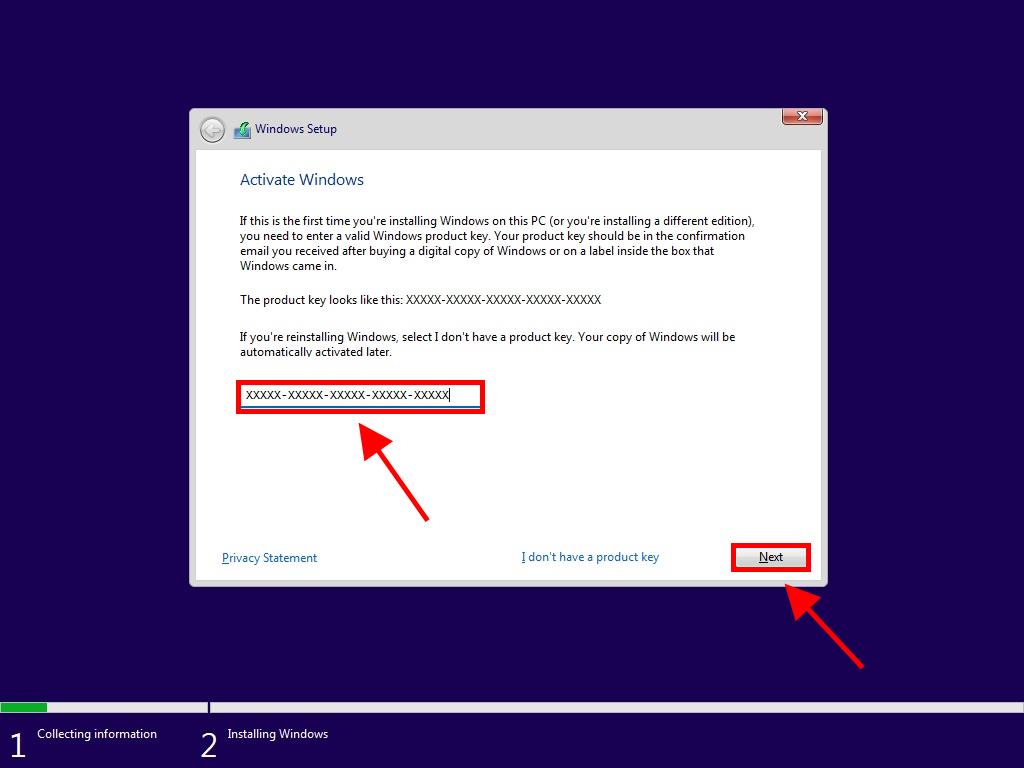
  6. Enter your Windows 11 product key and select Next.
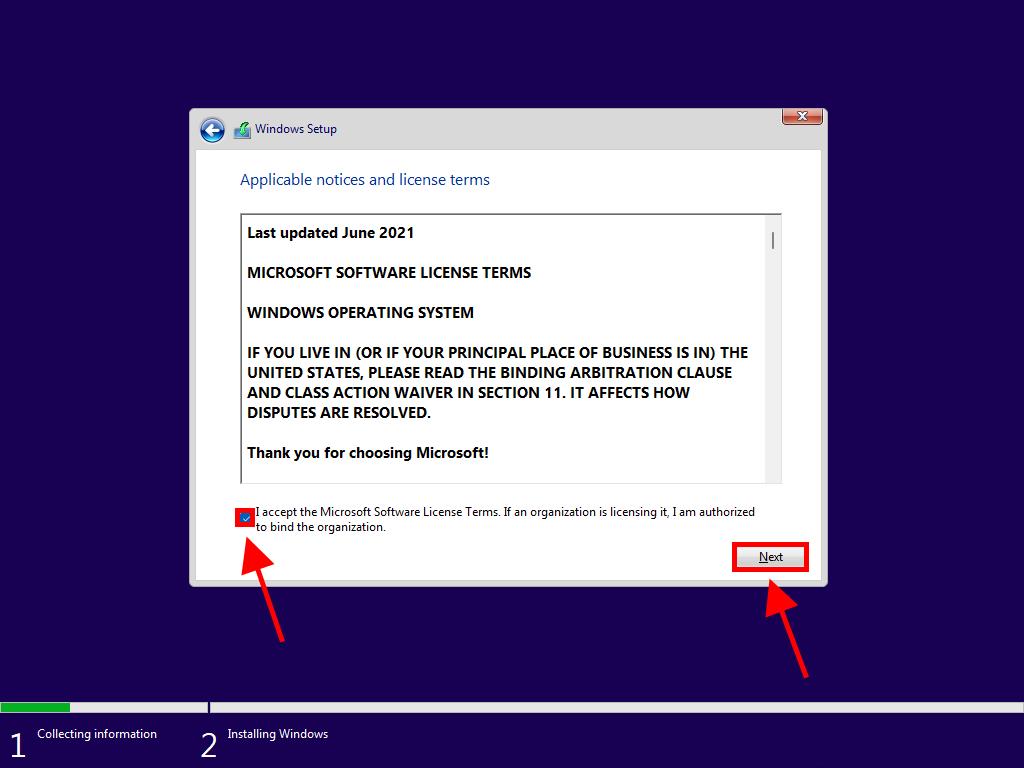
  7. Accept the license terms for Windows 11 by checking the appropriate box and click on Next.
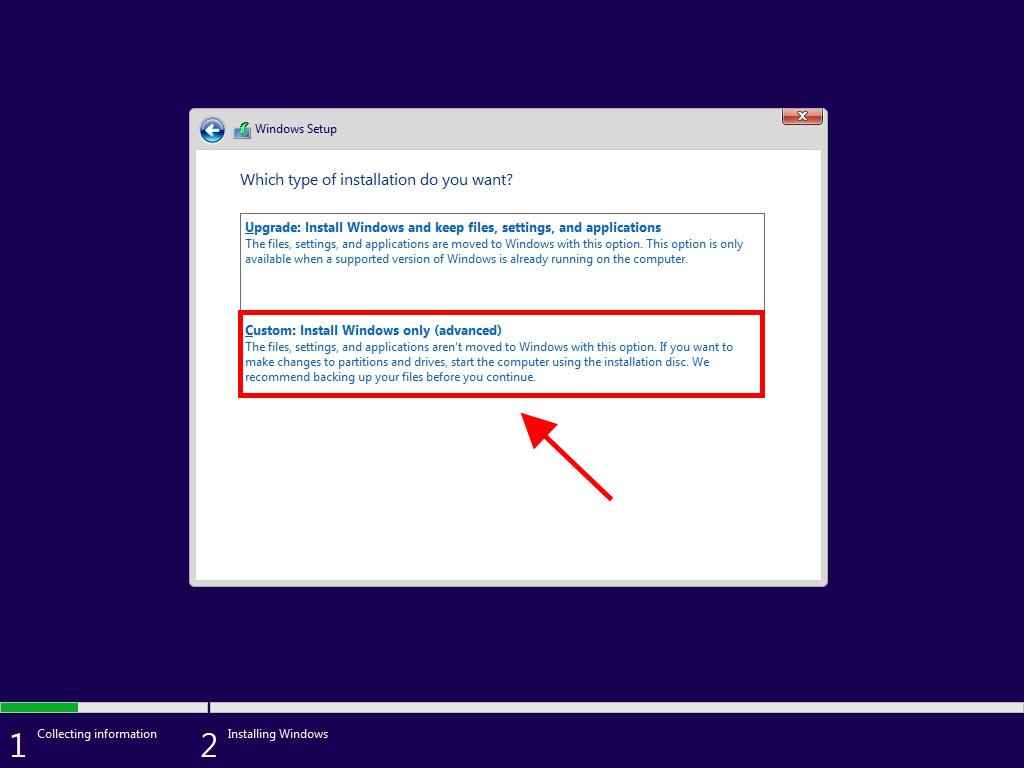
  8. On the subsequent screen, select Custom: Install Windows only (advanced).
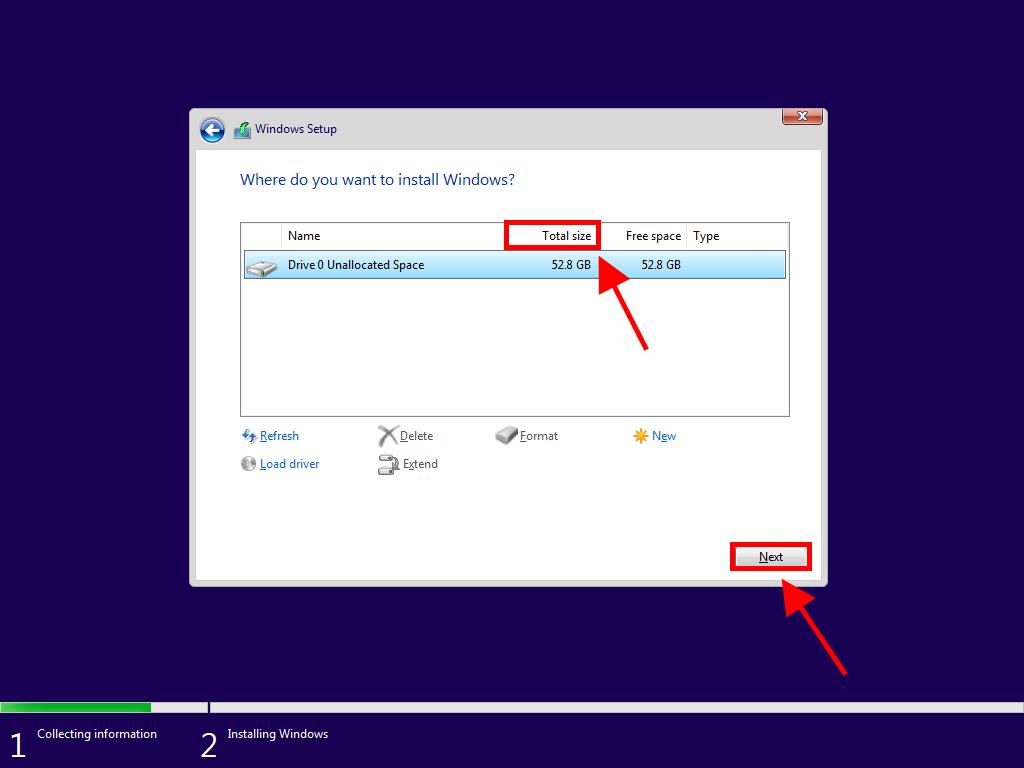
  9. Select the drive where you wish to install Windows 11 by examining the Total size column and opting for the drive with the most available space in GB.
  10. Windows installation on your PC will commence.
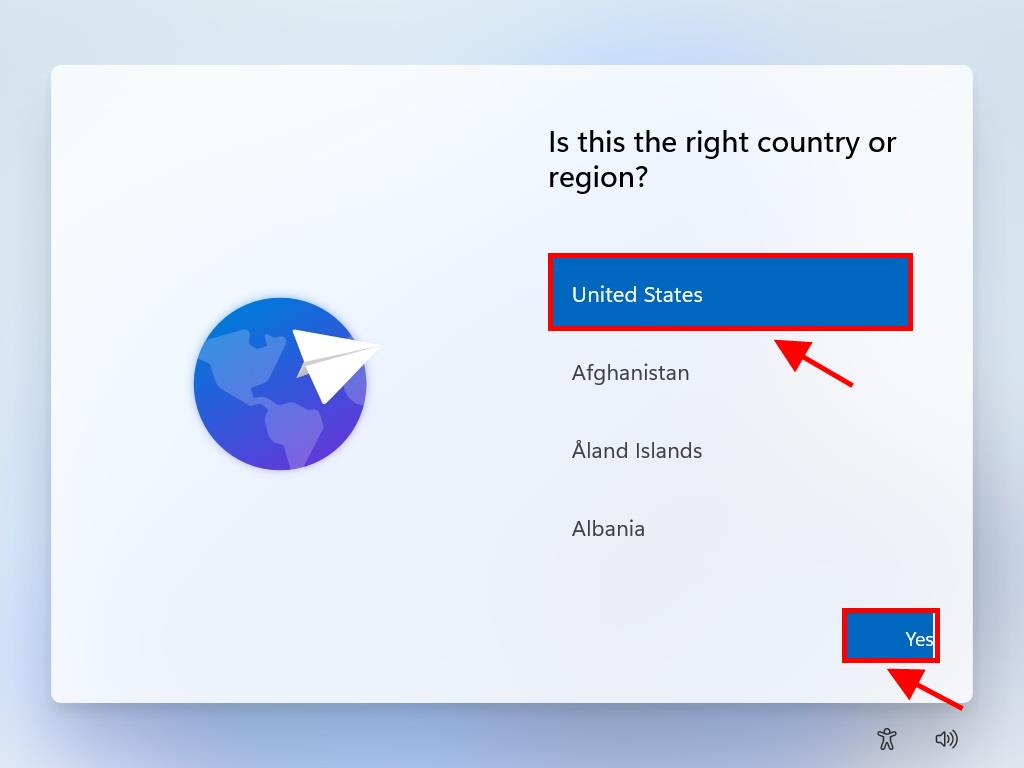
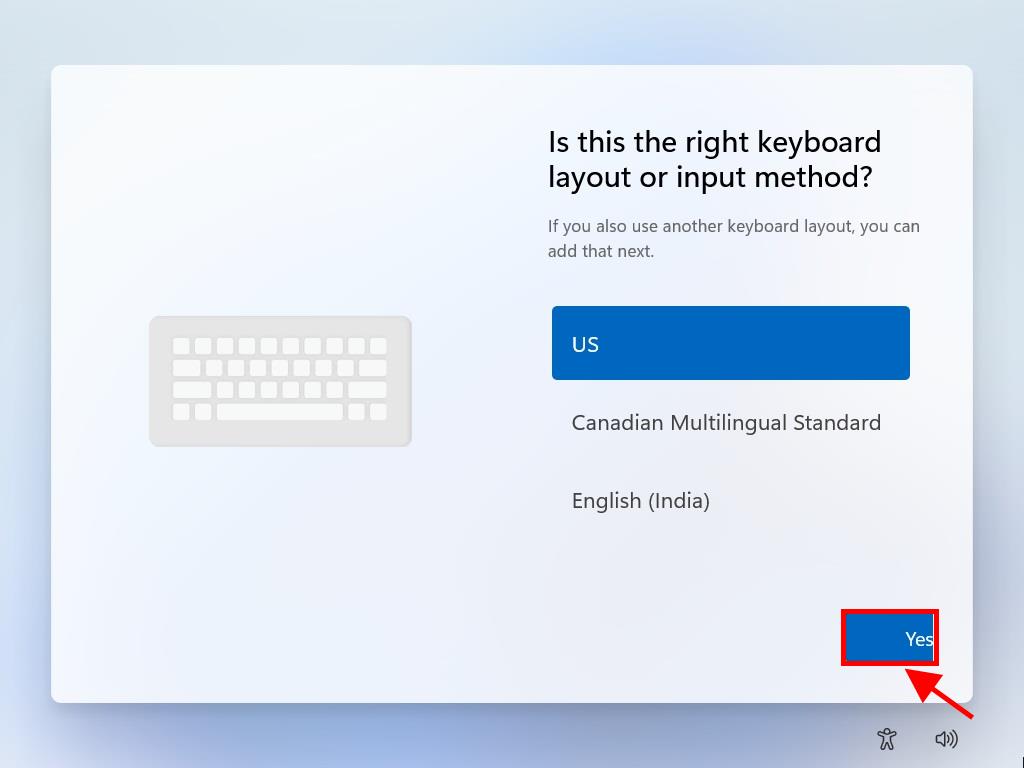
  11. After installation, select your region and press Yes.
  12. Choose the keyboard for your region and select Yes.
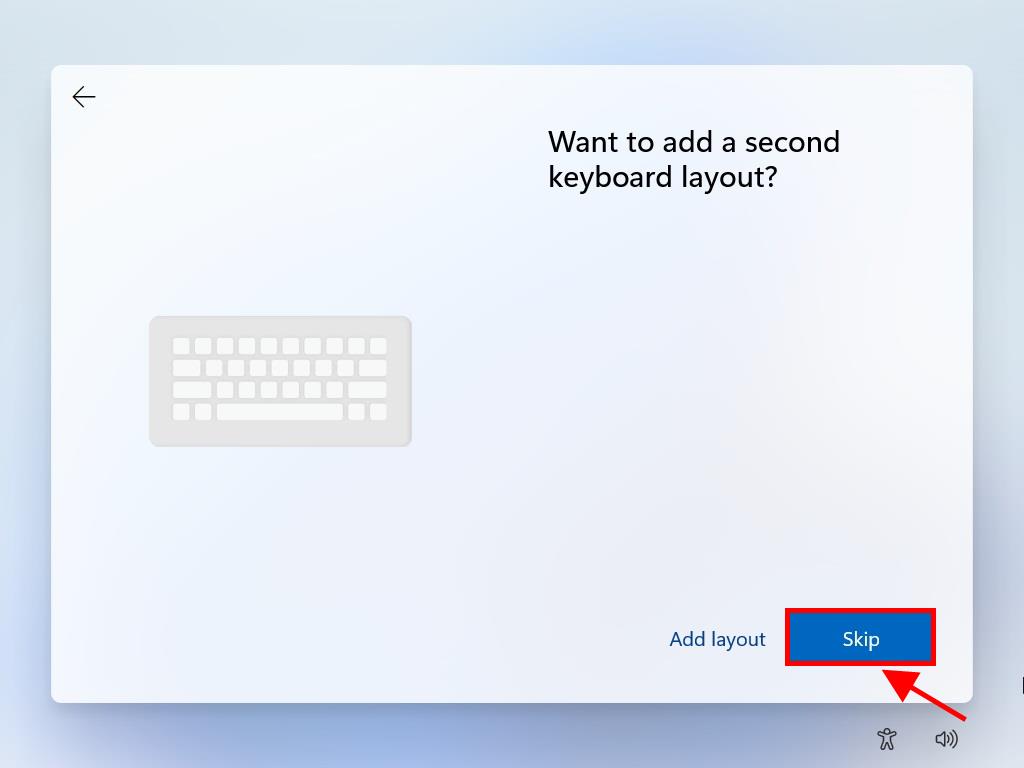
  13. If no secondary keyboard layout is needed, press the Skip button. The computer will automatically connect to the network if a wired connection is used. For wireless setups, you'll need to manually establish the connection, potentially requiring a security key.
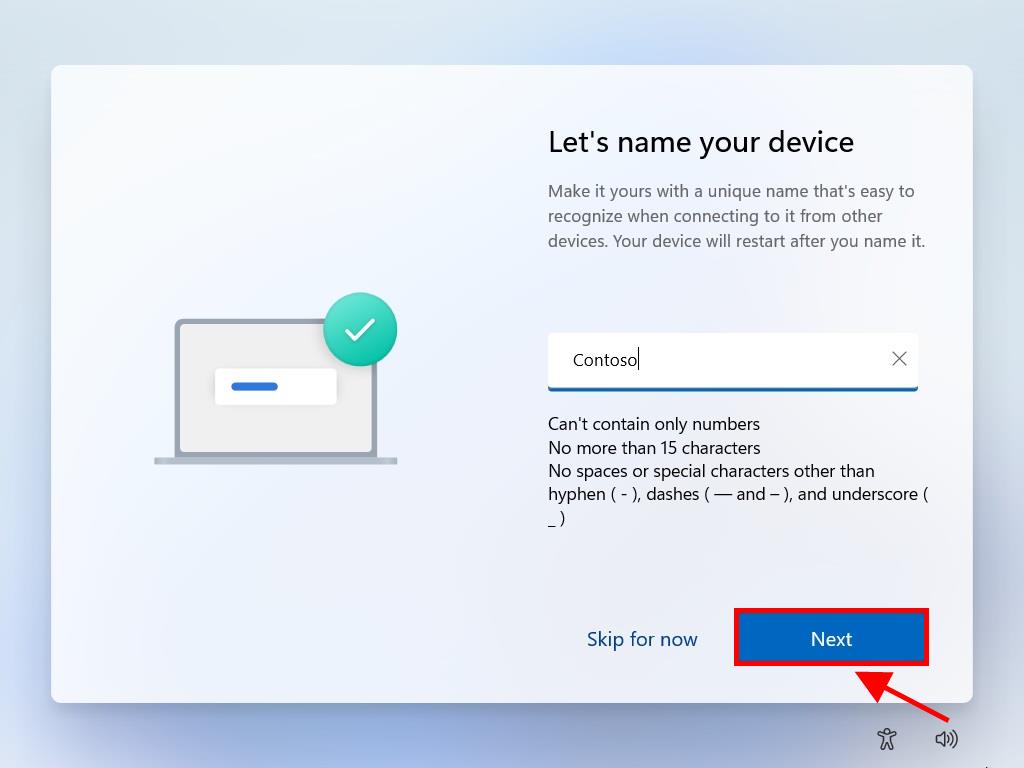
  14. Next, name your PC and click Next.
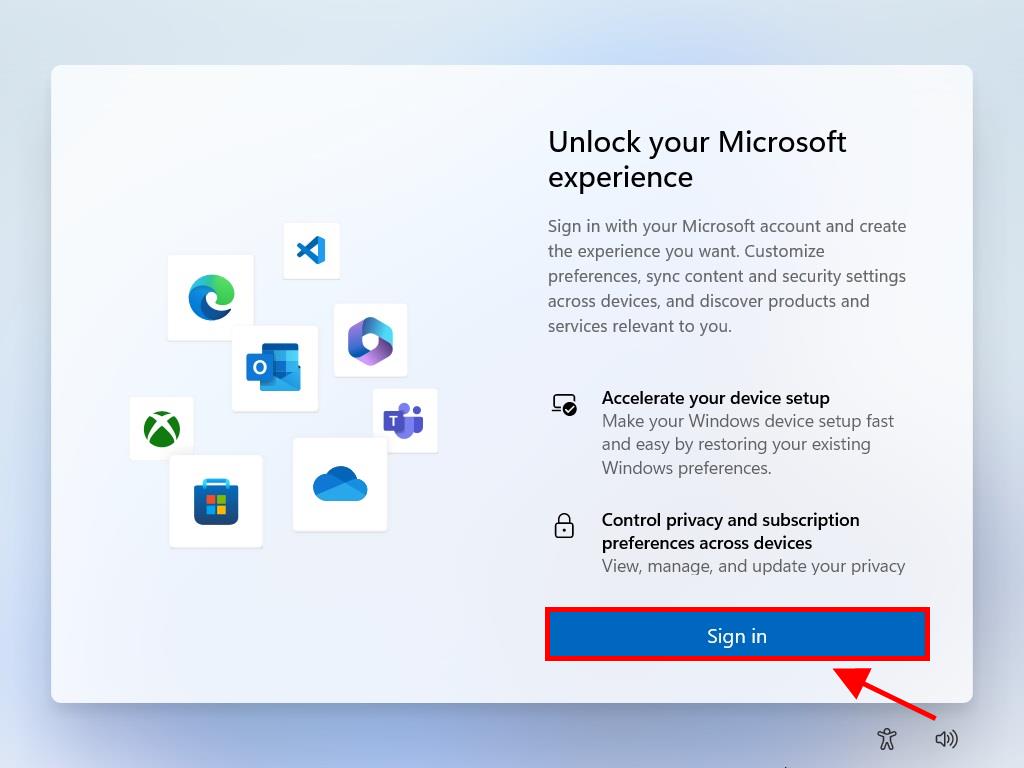
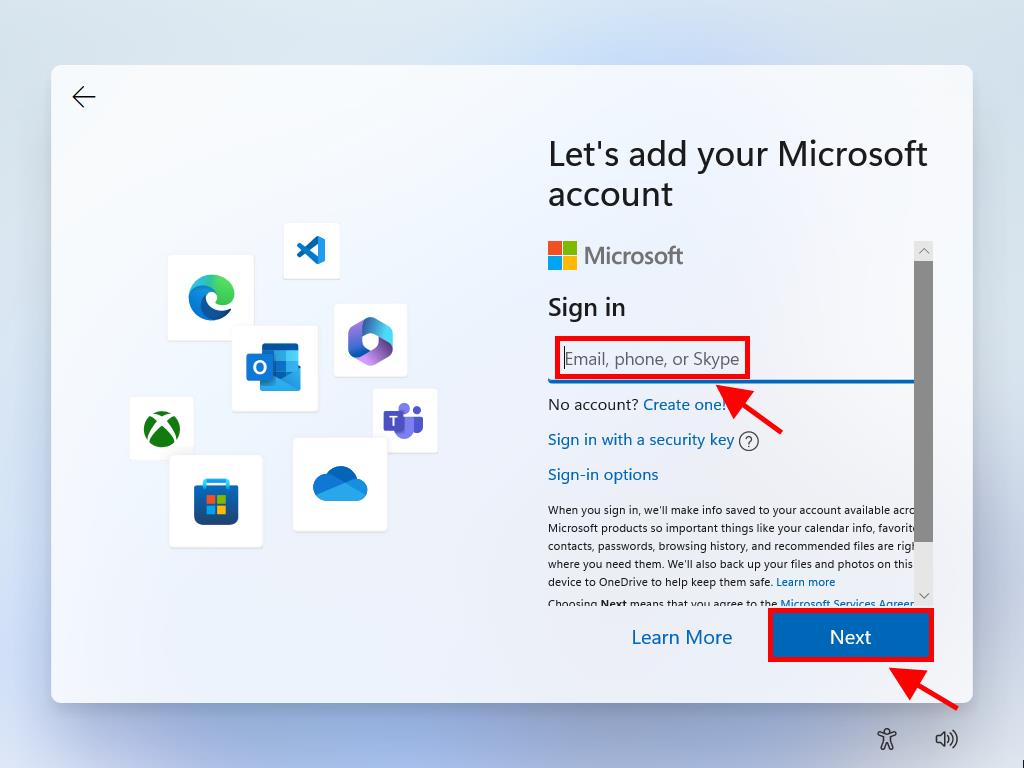
  15. For accessing your Microsoft experience, click Sign in.
  16. Input your email and press Next.
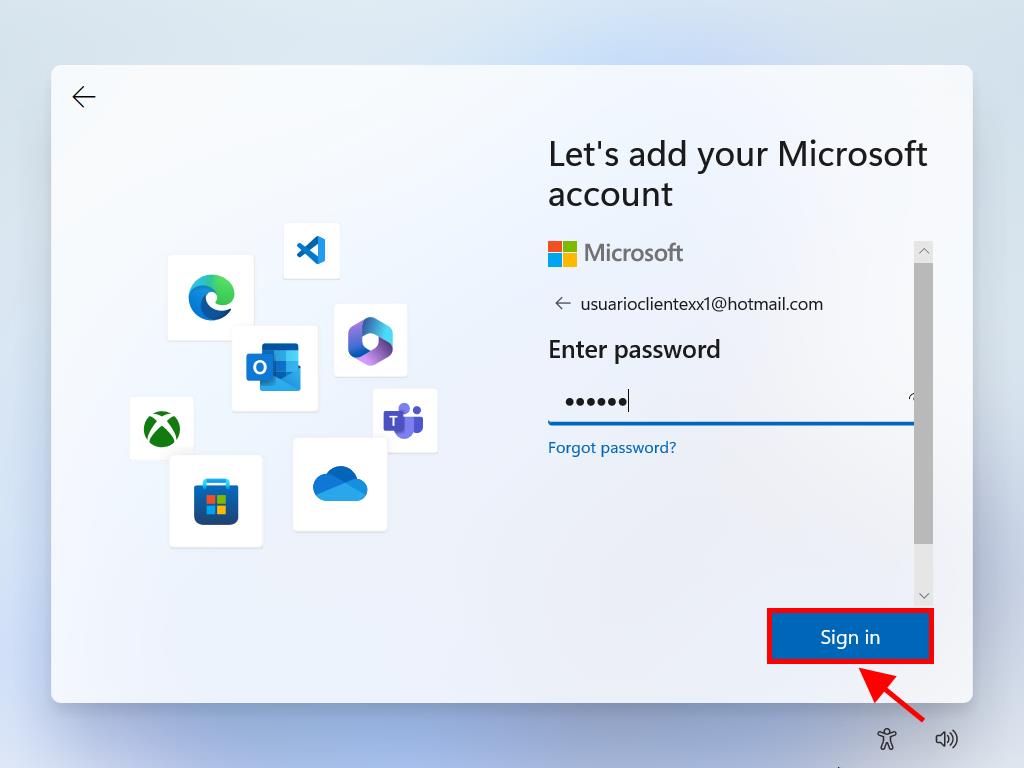
  17. Enter your password and select Sign in.
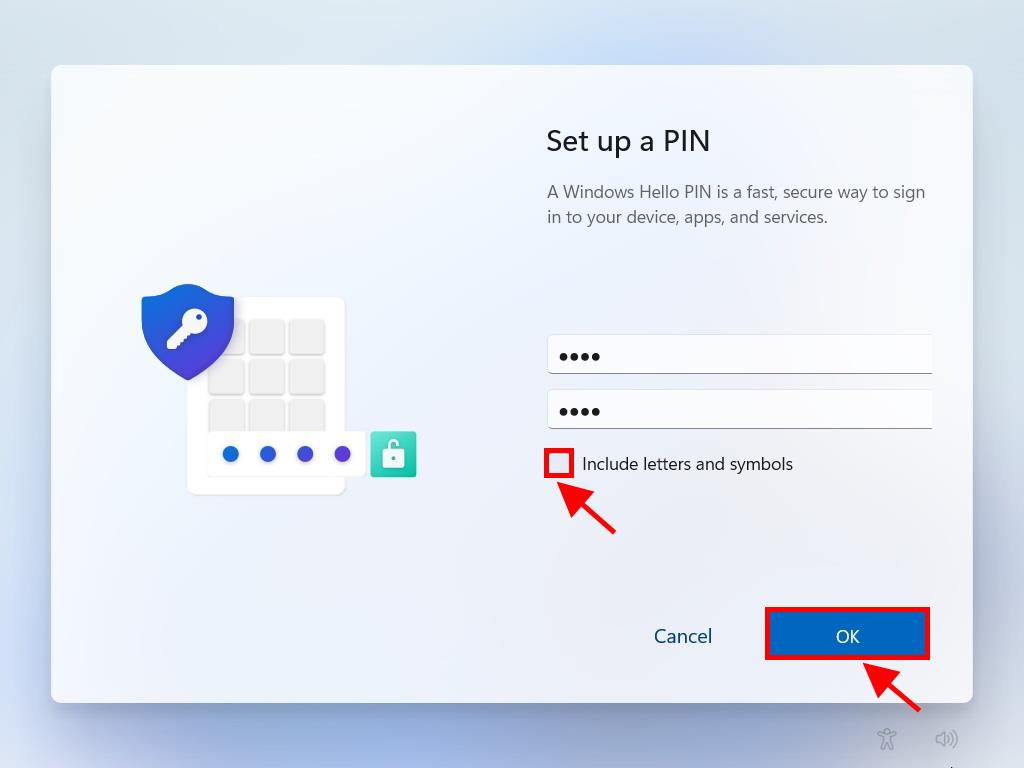
  18. Create a PIN that includes letters and symbols, check the box, and click Ok.
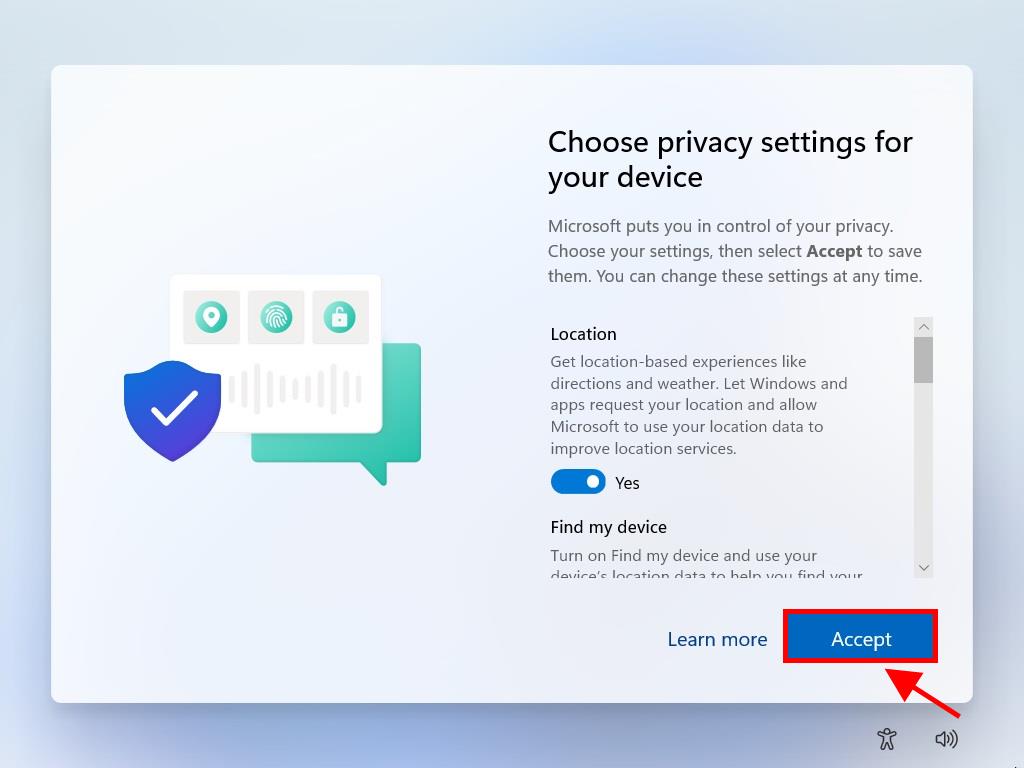
  19. In the privacy settings, select Accept.
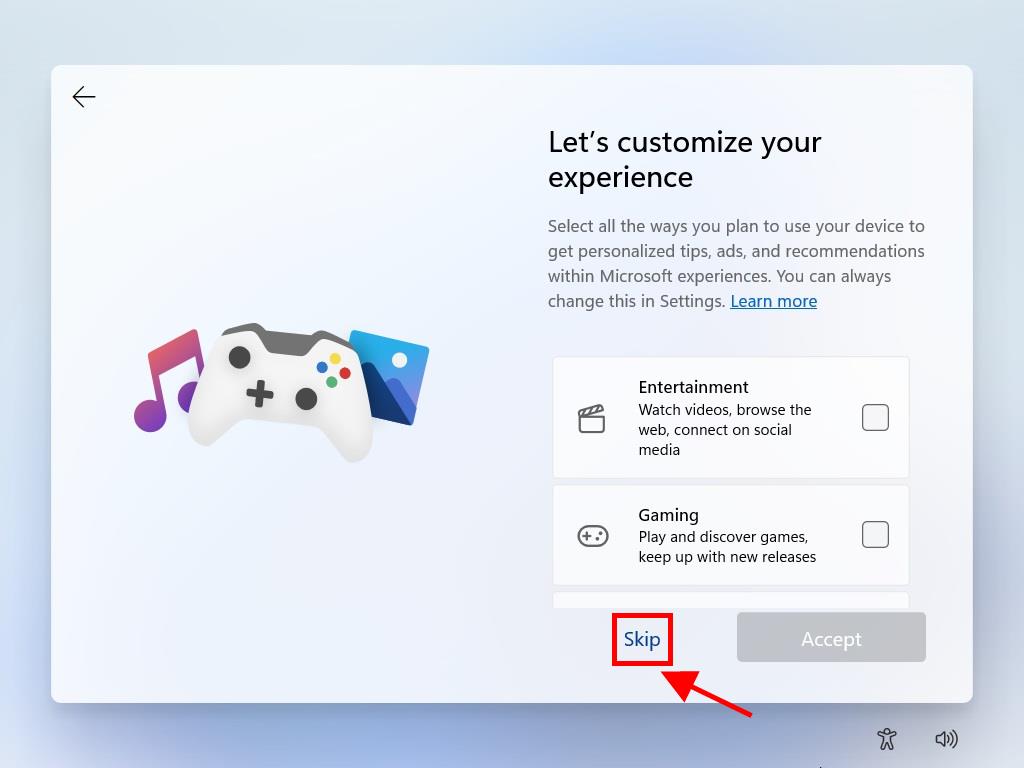
  20. If desired, customize your settings now or click Skip.
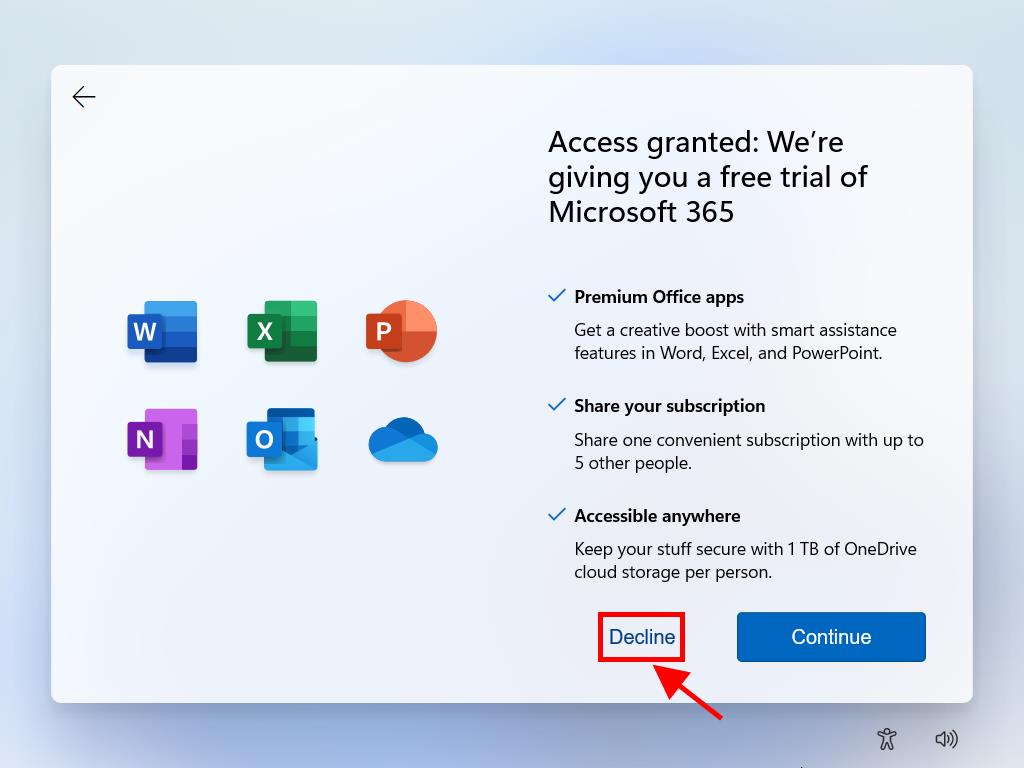
  21. Under Granted Access, select Decline.
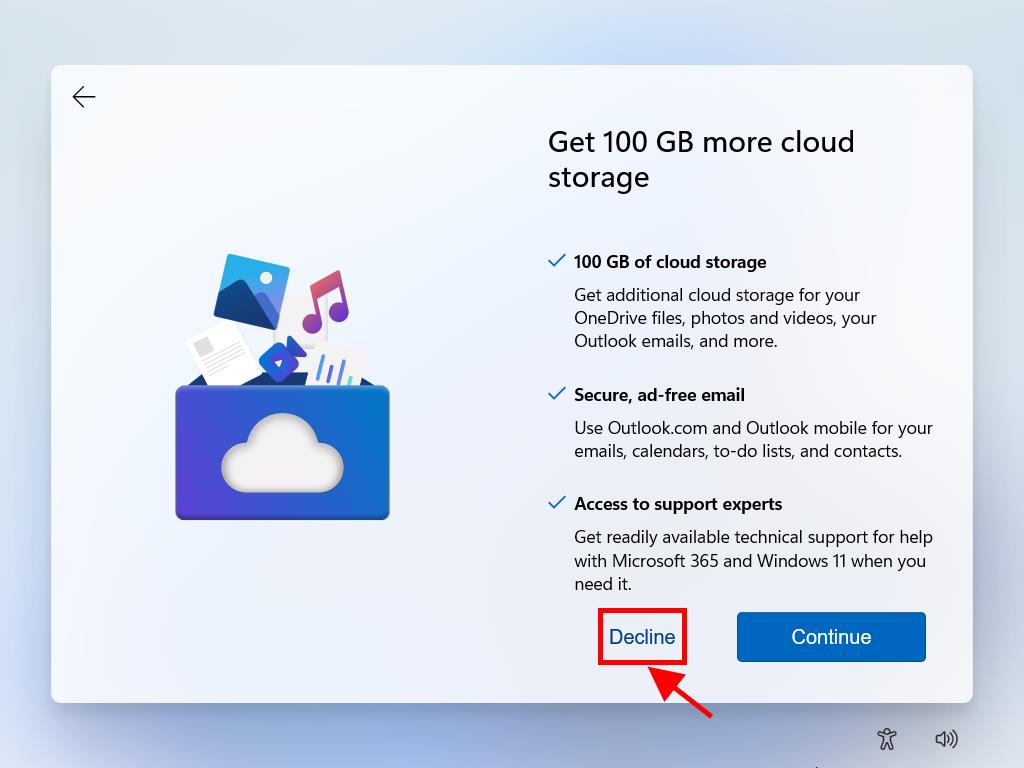
  22. Also, under the 100 GB cloud storage offer, select Decline.
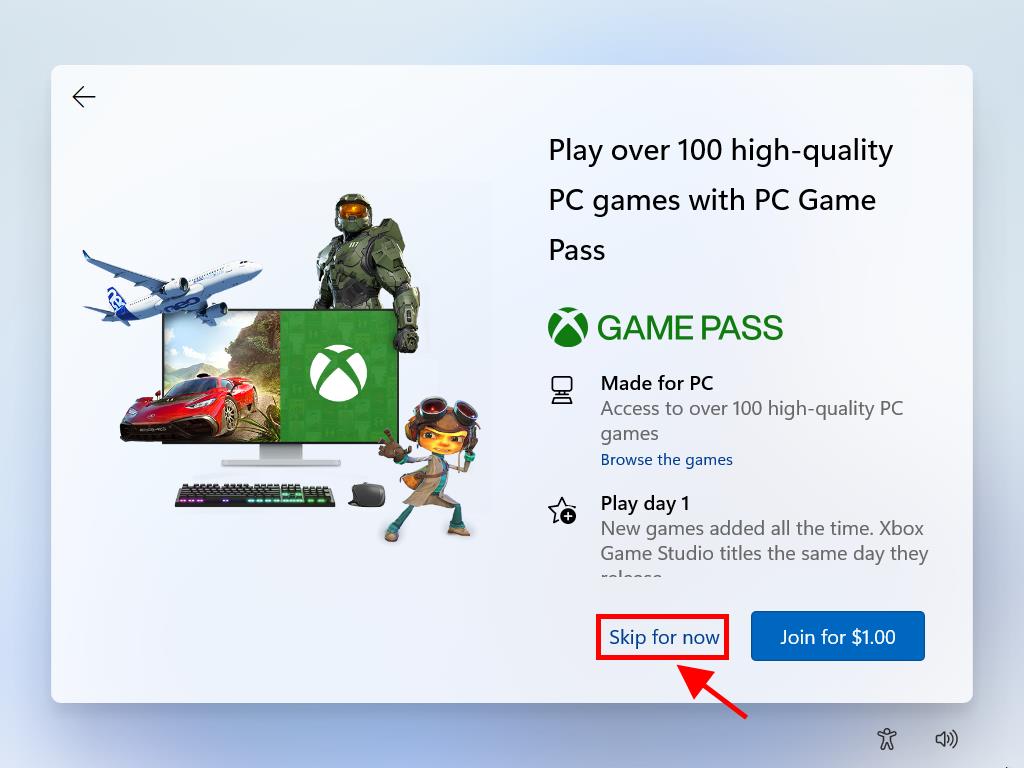
  23. Opt out of the Game Pass subscription by clicking on Skip for now.
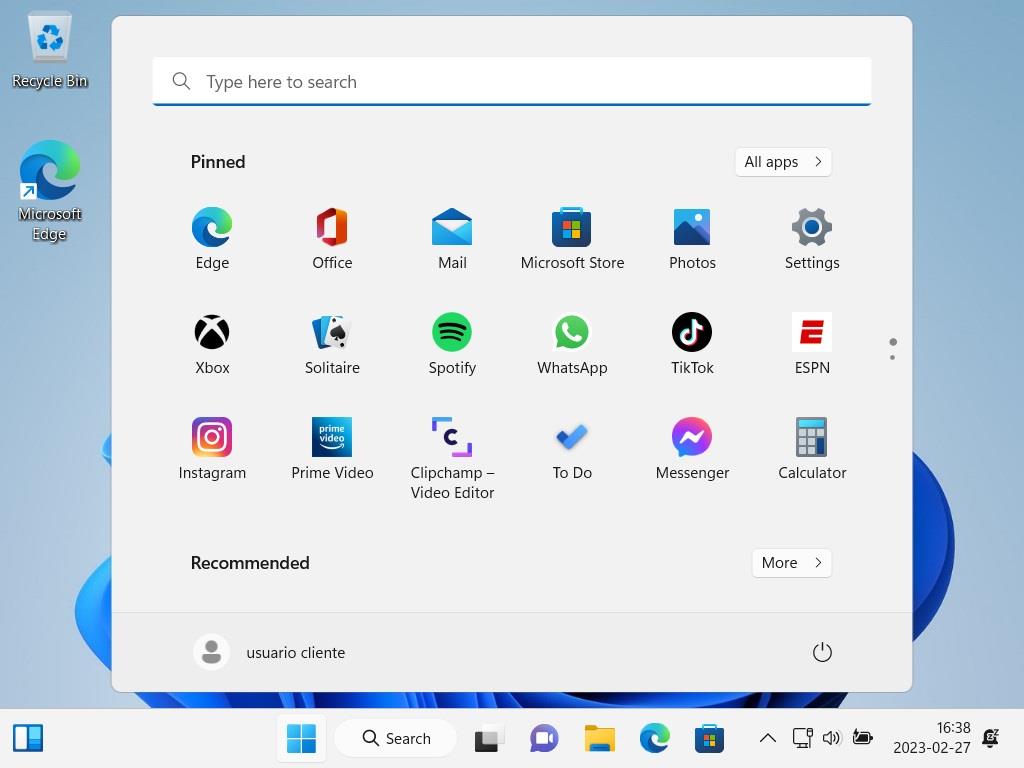
After finalizing these steps, Windows 11 will proceed with the installation on your device. Once complete, your PC will be ready for use, allowing you to fully enjoy your new software.
"; break; case "always-software.uk": $articulo = "

There are two methods for installing Windows 11:

Upgrading from Windows 10

  1. We recommend using the Windows 11 Installation Assistant from Microsoft. Download it for free here.
  2. After downloading the tool, you might need to install PC Health Check if prompted.
  3. Agree to the terms and conditions.
  4. The download and installation of Windows will start automatically.
  5. When the download completes, you can choose to restart your computer immediately or within 30 minutes.
  6. After restarting your PC, refer to the Installing Windows 11 from scratch section below for setup steps.

Installing Windows 11 from scratch

Note: The installation process can vary based on your PC.

To begin, connect the USB drive and follow these steps:

  1. Restart your PC and, when the manufacturer's logo appears, press the BOOT menu key (usually F2, F10, F11, F12, or Del) to change the boot order to USB.
  2. Note: The boot key may vary by PC model. Your PC will indicate the correct key.
  3. On restart, a screen will prompt you to Press any key to continue from CD or DVD.
  4. Note: Ensure the USB is set as the primary boot device.
  5. In the setup program, choose your language, time format, currency, and input method, then click Next.
  6. Click the Install now button.
  7. Enter your Windows 11 product key and click Next.
  8. Agree to the Windows 11 licence terms by ticking the box and clicking Next.
  9. Select Custom: Install Windows only (advanced).
  10. Select the drive where you want to install Windows 11 and click Next.
  11. Note: Look at the Total size column to choose the correct hard drive, usually the one with the most GB.
  12. Windows will now start installing on your PC.
  13. Select your region and click Yes.
  14. Next, choose the keyboard layout based on your region and click Yes.
  15. If a second keyboard layout is unnecessary, click Skip. The PC will connect to a wired network automatically, or you will need to set up a wireless connection manually (a security key might be required).
  16. Enter a name for your PC in the next box and click Next.
  17. Click Sign in to unlock your Microsoft experience.
  18. Enter your email address and click Next.
  19. Enter your password and click Sign in.
  20. Create a PIN with letters and symbols, tick the box, and click Ok.
  21. Accept the privacy settings by clicking Accept.
  22. Click Skip in the customisation settings.
  23. Note: You can customise the settings if you prefer.
  24. Under Granted Access, click Decline.
  25. In the Get 100 GB of cloud storage prompt, click Decline.
  26. Click Skip for now to bypass the Game Pass subscription promotion.
  27. After completing these steps, Windows 11 will continue the installation. Once done, your PC will be ready to use, and you can enjoy your new software experience.

"; break; case "always-software.ie": $articulo = "

There are two approaches to perform the installation:

Upgrading from Windows 10

  1. We suggest using the Microsoft upgrade tool called Windows 11 Installation Assistant, Download it here for free.
  2. Once downloaded, you might need to install PC Health Check if prompted.
  3. Accept the terms and conditions of use.
  4. Then, the download and installation of Windows will begin automatically.
  5. Once the download is complete, you can choose to restart your computer, but you must do so within 30 minutes.
  6. After restarting your PC, refer to the guide Installing Windows 11 from scratch below for step-by-step setup instructions.

Installing Windows 11 from scratch

Note: The process can vary greatly depending on your PC.

Connect the USB to proceed with the following steps:

  1. Restart your PC and, when the manufacturer's logo appears, look for the BOOT menu key, which is usually F2, F10, F11, F12, or Del, to open the menu and change the boot order to USB.
  2. Note: The setup key may vary depending on your PC's model. Your PC will indicate which key to use.
  3. After restarting your PC, you will see a screen that says Press any key to continue from CD or DVD.
  4. Note: Ensure the USB is set as the primary device.
  5. Once in the setup program, select your language, time format, currency, and input method, and click Next.
  6. Click the Install now button.
  7. Next, enter your Windows 11 product key and click Next.
  8. Read and accept the Windows 11 licence terms by ticking the box. Click Next.
  9. On the next screen, select Custom: Install Windows only (advanced).
  10. In the next box, select the drive where you want to install Windows 11 and click Next.
  11. Note: To determine which hard drive to choose, look at the Total size column and select the drive with the most space in GB.
  12. Windows will now begin to install on your PC.
  13. In the next box, select your region and click Yes.
  14. Next, select the keyboard based on the region you chose and click Yes.
  15. Click the Skip button if you don't need to set up a second keyboard layout. The PC will automatically connect to the network if using a wired internet connection. If you have a wireless connection, you'll need to set it up manually (a security key might be required).
  16. In the next box, enter a name for your PC, then click Next.
  17. In the section to unlock your Microsoft experience, click Sign in.
  18. Enter your email address and click Next.
  19. Enter your password and click Sign in.
  20. Create a PIN that includes letters and symbols, tick the box, and click Ok.
  21. In the privacy settings, click Accept.
  22. In customising your experience, click Skip.
  23. Note: You can customise the settings to your liking if you prefer.
  24. Next, under Granted Access, click Decline.
  25. Then, under Get 100 GB of cloud storage, click Decline.
  26. Click Skip for now to bypass the Game Pass subscription promotion.
  27. Once you have completed the steps, Windows 11 will continue with the installation on the device. When finished, your PC will be ready for use, and you can enjoy the experience with your new software.

"; break; case "always-software.com.au": $articulo = "

There are two methods for installing Windows 11:

Upgrading from Windows 10

  1. Use the Microsoft upgrade tool, Windows 11 Installation Assistant. Download it for free here.
  2. After downloading the tool, you may need to install PC Health Check if prompted.
  3. Accept the terms and conditions of use.
  4. The download and installation of Windows will begin automatically.
  5. Once the download is complete, restart your computer within 30 minutes.
  6. After restarting, follow the guide below to complete the setup of Windows 11.

Installing Windows 11 from scratch

Note: The process can vary depending on your PC.

Connect the USB and follow these steps:

  1. Restart your PC and, when the manufacturer's logo appears, press the BOOT menu key (usually F2, F10, F11, F12, or Del) to open the menu and change the boot order to USB.
  2. Note: The setup key may vary depending on your PC's model.
  3. After restarting, you'll see a screen that says Press any key to continue from CD or DVD.
  4. Note: Ensure the USB appears as the primary device.
  5. In the setup program, select your language, time format, currency, and input method, then click Next.
  6. Click Install now.
  7. Enter your Windows 11 product key and click Next.
  8. Read and accept the Windows 11 licence terms. Click Next.
  9. On the next screen, select Custom: Install Windows only (advanced).
  10. Select the drive where you want to install Windows 11 and click Next.
  11. Note: Choose the hard drive with the most space in the Total size column.
  12. Windows will now begin to install on your PC.
  13. Select your region and click Yes.
  14. Select the keyboard based on the region you chose and click Yes.
  15. Click Skip if you don't need a second keyboard layout. Your PC will connect to a wired internet connection automatically. For wireless, set up the connection manually (you may need a security key).
  16. Enter a name for your PC and click Next.
  17. To unlock your Microsoft experience, click Sign in.
  18. Enter your email address and click Next.
  19. Enter your password and click Sign in.
  20. Create a PIN with letters and symbols, tick the box, and click Ok.
  21. In the privacy settings, click Accept.
  22. In customising your experience, click Skip.
  23. Note: Customise settings if you prefer.
  24. Under Granted Access, click Decline.
  25. Under Get 100 GB of cloud storage, click Decline.
  26. Click Skip for now to bypass the Game Pass subscription promotion.
  27. Once all steps are completed, Windows 11 will finalise the installation. Your PC will be ready to use, and you can enjoy your new software.

"; break; case "always-software.co.nz": $articulo = "

Explore two primary approaches to initiate the installation:

Transition from Windows 10

  1. To begin, utilize the Windows 11 Installation Assistant, available for free at this link.
  2. After securing the tool, you might need to set up PC Health Check following a prompt.
  3. Agree to the usage terms and conditions.
  4. Installation and download of Windows commence forthwith.
  5. Complete the download to decide on restarting your computer, which must occur within 30 minutes.
  6. Following the restart, refer to the below guide Installing Windows 11 from the ground up for detailed instructions.

Fresh Installation of Windows 11

Note: Installation can differ based on your specific PC.

Use a USB for the following:

  1. Reboot your PC and upon seeing the manufacturer's logo, press the BOOT menu key, typically F2, F10, F11, F12, or Del, to access the menu and alter the boot sequence to USB.
  2. Note: The setup key may differ depending on the model of your PC.
  3. After the restart, a screen prompting Press any key to continue from CD or DVD will appear.
  4. Ensure USB is set as the primary boot device.
  5. Within the setup program, select your preferred language, time format, currency, and input method, then press Next.
  6. Press the Install now button.
  7. Enter your Windows 11 product key and proceed by clicking Next.
  8. Accept the Windows 11 licence terms by marking the appropriate box, then press Next.
  9. At the subsequent screen, choose Custom: Install Windows only (advanced).
  10. Select the hard drive with the most storage space in GB for installation and proceed by clicking Next.
  11. To determine which drive to select, refer to the Total size column.
  12. Windows installation commences immediately on your PC.
  13. Next, select your region and press Yes.
  14. Choose the appropriate keyboard for your region and confirm with Yes.
  15. If no second keyboard layout is needed, opt for the Skip button. The PC will automatically connect to a wired network. For wireless connections, you must manually establish the network (a security key may be required).
  16. Enter a name for your PC and continue by pressing Next.
  17. To access Microsoft services, click Sign in in the next section.
  18. Input your email address and proceed with Next.
  19. Type your password and click Sign in.
  20. Create a PIN incorporating letters and symbols, check the box, and confirm with Ok.
  21. Accept the privacy settings by clicking Accept.
  22. In the personalisation phase, choose to Skip adjustments.
  23. You may personalise settings at your discretion.
  24. Under Granted Access, opt for Decline.
  25. Also, under the promotion for 100 GB of cloud storage, select Decline.
  26. Bypass the Game Pass subscription by clicking on the Skip for now button.
  27. Following these steps completes the installation of Windows 11 on your device. Upon conclusion, your PC is prepped for use, letting you relish your new software setup.

"; break; case "always-software.ca": $articulo = "

Two approaches exist for the installation process:

Upgrading from Windows 10

  1. We suggest utilizing the Microsoft tool known as Windows 11 Installation Assistant, which can be downloaded here for free.
  2. After downloading the tool, you may need to install PC Health Check if prompted.
  3. Agree to the usage terms and conditions.
  4. The Windows download and installation will start automatically.
  5. After the download is complete, decide if you want to restart your computer now or later; you must restart within 30 minutes.
  6. Once your PC restarts, follow the Installing Windows 11 from scratch guide below for detailed setup steps.

Installing Windows 11 from Scratch

Note: The installation steps may differ based on your computer's model.

Begin by connecting a USB to your PC for the following steps:

  1. Restart your PC and press the BOOT menu key (commonly F2, F10, F11, F12, or Del) when the manufacturer's logo appears to enter the menu and alter the boot sequence to USB.
  2. Note: Your computer will specify which key to use.
  3. After the restart, a prompt will appear saying Press any key to continue from CD or DVD.
  4. Select your language, time, currency format, and input method in the setup program, and click Next.
  5. Press the Install now button.
  6. Input your Windows 11 product key and select Next.
  7. Agree to the Windows 11 license terms by checking the box and click Next.
  8. On the subsequent screen, select Custom: Install Windows only (advanced).
  9. In the box that follows, select the drive to install Windows 11 and click Next.
  10. Note: Select the drive with the most space shown under the Total size column.
  11. Windows installation will commence on your PC.
  12. Select your region and click on Yes in the next box.
  13. Choose the keyboard layout that corresponds with your region and click on Yes.
  14. If a second keyboard layout is not required, click the Skip button. Your PC will automatically connect to the network if using a wired connection. For wireless connections, you will need to manually set up the connection (a security key may be needed).
  15. Name your PC in the following box and click Next.
  16. In the section to unlock your Microsoft experience, click Sign in.
  17. Enter your email and click Next.
  18. Input your password and click Sign in.
  19. Create a PIN that includes letters and symbols, check the box, and click Ok.
  20. Accept the privacy settings by clicking Accept.
  21. Skip customising your experience by clicking Skip.
  22. Note: You may customise the settings to your preference if desired.
  23. Click Decline under Granted Access.
  24. Decline the offer of 100 GB of cloud storage by clicking Decline.
  25. Choose to Skip for now regarding the Game Pass subscription offer.
  26. After completing these steps, the installation of Windows 11 will proceed on your device. When finished, your PC will be prepared for use, ready for you to enjoy your new operating system.

"; break; default: $articulo = "RR-ARTI-CONT-W11_005-RR"; break; } echo $articulo; ?>"

See what our happy customers are saying.

We are committed to your success, and their testimonials show why we're the go-to source for Microsoft licenses.